I got a demand from the online forum for this effect from among our Members staying in Japan. This is a method that is all the rage over there. Not knowing exactly what is impact is called, I decided to dub it the “Anime Bead” impact. Delight in!
COMPONENTS
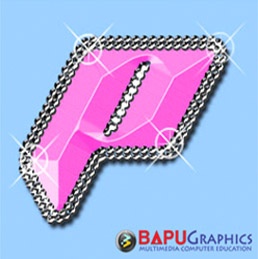
ANIME BEADS Photoshop Tutorial
Step 1
Create a brand-new document
Create some text. (I utilized Planet Kosmos at 50 points).
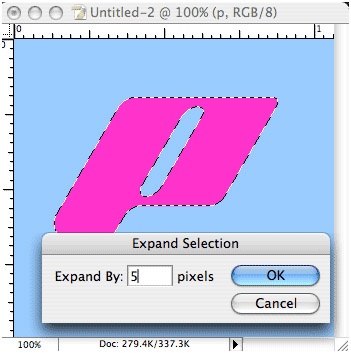
Ctrl/Cmd+Click the texts’ layer thumbnail to load the choice.
Select > Customize > Expand.
Enter 5 pixels and click ok.
Step 2.
The option ought to now look like this.

Step 3.
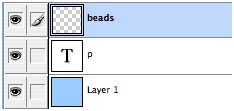
With the option still active produce a new layer and name it beads.
Step 4.
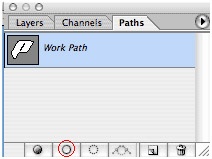
Go to the Paths Scheme.

Click the top right arrow and choose “Make Work Course” from the fly out menu.
Get in a setting of 0.5 (The minimum enabled).
Click ok.
We have actually now made a course out of the selection.
Step 5.
Prepare the brush …
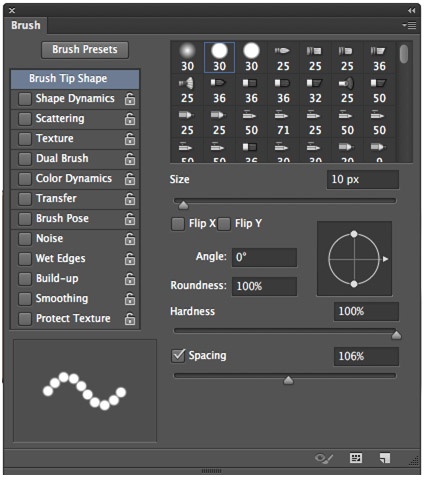
Pick White as your foreground color.
Select the Brush tool from the Tool kit.
Open the brushes panel.
Shut off all the boxes on the left.
Choose a 10 Pixel difficult brush.
Set the spacing to 105 % (This will make a dotted line).
Step 6.
Click the Stroke course button as shown.
The course will now be brushed with white dots.
Click in the blank area of the paths palette (Below the work path) to shut off the path.
Step 7.
Return to the layers scheme.
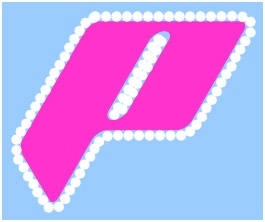
You should now have something like this.
Step 8.
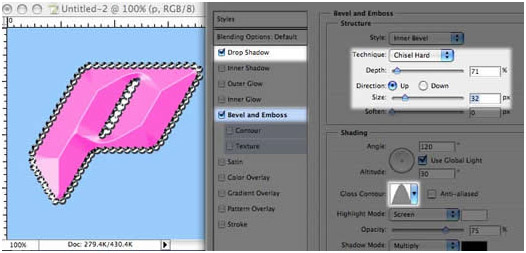
Click the little “f” at the bottom of the layers panel to add a layer design.

Pick bevel and emboss and use the settings shown.
Step 9.
Choose inner shadow and use the shown settings.
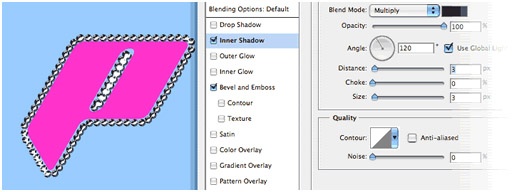
Click Ok to apply the design.
Step 10.
At this point we have an issue. The text is a bit little for the beads (There is a gap showing).
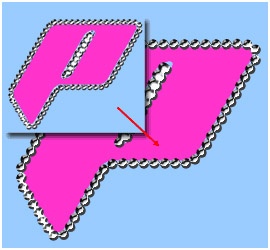
Increase the size of the text to make up, the edge of the text need to associate the beads.
Step 11.
Add a layer design to the text. Use a default drop shadow and a Bevel as revealed.
Step 12.
In this variation, I duplicated the step and broadened by 10 pixels to create a 2nd ring of beads. I likewise improved it a bit with some glimmers.
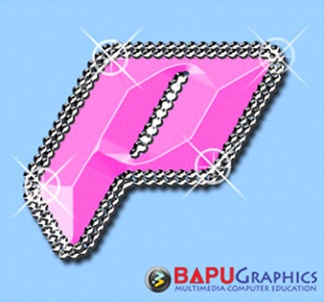
I hope you like this impact.
