Here is a tutorial which will certainly show you how to produce a film-strip from scratch. This is actually beneficial and requested tutorial. You can paste your photographs into it. You can utilize it as a design element, or for displaying your photos.
INGREDIENTS
Making a Filmstrip from Scratch Photoshop Tutorial
Step 1
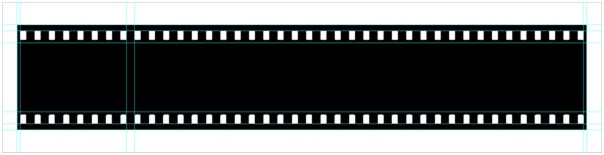
To create a filmstrip, we will certainly utilize an original filmstrip for the measurements. For this tutorial I will utilize cm (centimetres) for my measurements.
Develop a brand-new document, width 20cm and height 5cm @ 300 pixels/ inch (you can always make the image smaller sized NEVER larger, so begin huge!). In this tutorial we’re going to utilize guides. We desire these to be in cm so make use of CTRL+R to reveal the rulers. Right click someplace on the rulers and choose Centimeters.
We need a guide line on 0.5 and 19.5 cm vertical and 0.75 and 4.25 cm horizontal. For me the simplest method to do that is to go to VIEW => New Guide … Just complete 0.5 cm (use also the cm otherwise you’ll get px and we aren’t making use of that at this moment). By doing this we don’t make the filmstrip too big or to little but perfectly to the best measurements. Do the same with the rest of the guides.This way we get the guidelines on the perfect spots, which we need!
Step 2
Make sure we have black as our foreground and white as our background color. (Press the D key).
Get the Rectangular shape Device, make sure you have actually shape layers chosen (we wish to make the layer more editable) and create the rectangle required for the filmstrip shape.

Step 3
We require two more guides. Put one on 0.6 cm vertical and the other at 0.95 cm horizontal.
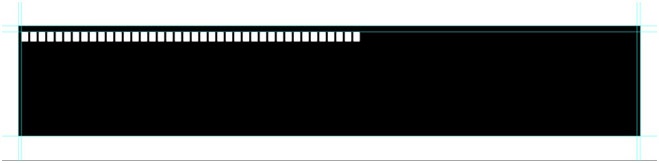
Let’s make the sprockets: Get the Rounded Rectangular shape Device and under the alternatives (the little black arrow on the left side of Radius) modification this to dealt with size and the dimension to 2mm and 3mm (width and height). Use a radius of 3px.
Click as soon as in the overlap of the guidelines and press CTRL+BACKSPACE (Cmd+Del) to fill it with white (if it’s not white already).
Step 4
We need another guide line, this time at 19.4 cm vertical (VIEW => New Guide …).
Now here’s the challenging part, so focus and read thoroughly!
Focus for a better view … With the Path Choice tool, click shape 2. Press CTRL+ALT+T (complimentary Transform), press and hold the ALT and SHIFT then mouse click in the rectangular shape. Drag the shape to the right (location doesn’t matter, I’ll discuss later) and push the ENTER key on the ideal side of your key-board (NOT the one under the backspace, this keeps the choice).
Press CONTROL+ALT+SHIFT+T 39 more times and see exactly what takes place. (Transform once again command) Make certain you have 40 white little rounded rectangular shapes before you push the ENTER key again.
Step 5.
The next thing we are going to do is line up the rounded rectangles. With the Course Selection Device, click on the last rectangular shape (in my case number 40). Press and hold the SHIFT secret, now click and drag the shape to where it hits the overlap of the guidelines on the ideal side of the image. Select around the rounded rectangle (all of them).
Step 6.
In the alternative bar, click on the Distribute Horizontal Centers (second icon on the right) and see what happens! Isn’t really this great?

Step 7
Another standard is needed to place the bottom sprockets: (remember we want it to look as original as possible), this time on 4.05 cm.
Let’s copy the gears to the bottom: Replicate Shape 2 (CTRL+J) and see to it the move tool is chosen. Now press the SHIFT secret and hold down the arrow secret (pointing down) to move it to the guideline. Utilizing the SHIFT will move the layer 10px at a time.

Step 8
Time for the frame dividers: This time we need 4 more guidelines. The first on 1.35 cm, the 2nd on 3.65 cm. The 3rd and 4th we have to do by eye. Focus between the 8th and 9th rounded rectangular shape (I zoomed in at 1600 %!) and put the 3rd guide line behind the 8th rounded rectangle then guideline number 4 must begin on the 9th rounded rectangle.
Step 9
Use the Rectangle Device and make a rectangle shape utilizing the guides we just developed. With the very same strategy we used on the little rounded rectangular shapes, we copy and move the shape when it strikes guideline number 4 from the earlier step.
So with the Path Option Device, click the rectangular shape. Press CTRL+ALT+T (totally free Transform), press and hold ALT and SHIFT then mouse click in the rectangle. Drag the shape to the right where it snaps to the standard and press the ENTER key on the ideal side of your key-board (NOT the one under the backspace, this keeps the choice).
Press CONTROL+ALT+SHIFT+T 3 more times and see what occurs. We now have 5 white rectangles all on the same area and in a nice line with the rounded rectangular shapes. Now push the ENTER key again.
Step 10
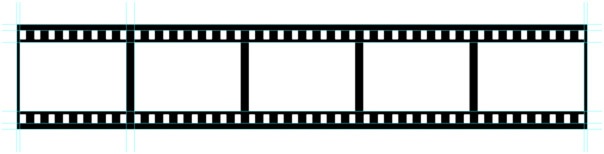
Up until now we have the basic shape for our filmstrip and it fits completely. All we have to do now is to dress it up.
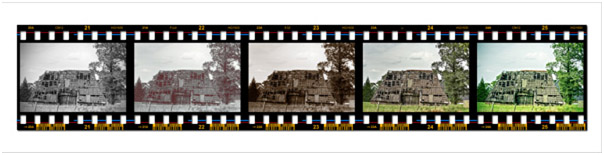
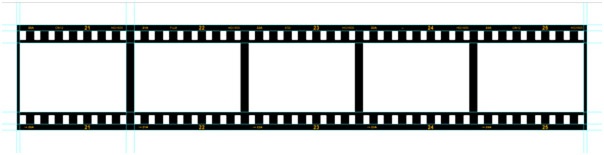
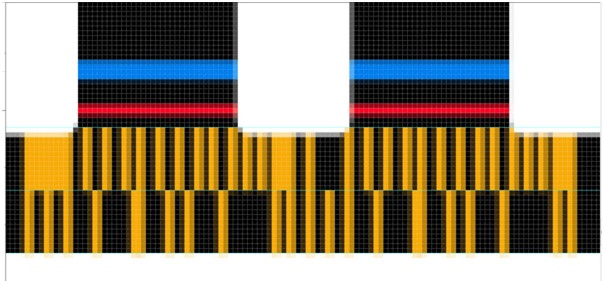
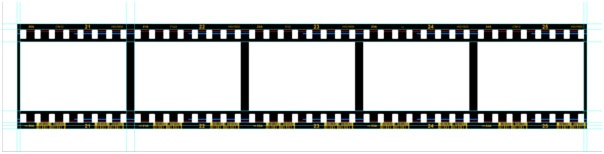
Use the Type Device to include the numbers and letters. Look very carefully to your very own filmstrip, if you are using that one. In the early days of photography I made use of a lot of FUJI 1600 movie to shoot my show photos. Utilize the image belowas a reference to put everything in place if you do not have a filmstrip of your very own. I used Arial Strong 5pt for the bigger numbers (21, 22, 23, etc.) and the same font style however 3pt for the smaller sized numbers (21A, 22A, 23A, and so on). For the words HG1600 etc. I use Arial Routine 3pt, the color is #E 9AB17, a nice golden color.
Utilize the Line Device to make the little arrows next to the smaller sized numbers. In the Choice Bar select 1 px for the Weight and alongside it click the little black arrow and choose End where it states Arrow Head. Use 10 % for the Width and 10 % for the Length, leave Concavity to 0 %.
Step 11
On the initial filmstrip I saw some blue and red lines, so let’s make them right here too. Select a nice red and blue color for the foreground and background color. I picked #ED 2619 and # 1781E9. Use the Line Device and eliminate the arrow head in the Choice Bar. Simply draw a 2 px straight line (utilize the SHIFT) from one end to the other and press ALT+BACKSPACE to change the color with the red one. Location this layer under the Shape 2 layers and above the Shape 1 layer. Move the line in place if required.
Replicate this layer (the red line) and move it up so it fits the upper rounded rectangles. Next are the blue lines. These are smaller sized however thicker. Draw a 4px straight line, start in-between the 4th and 5th rounded rectangular shape then move (when holding SHIFT) to where the 9th rounded rectangular shape beginnings. Replicate this layer and move it to the right so it begins in between 12th and 13th then ends before the 17th rounded rectangle. Duplicate it once more and move it on the same area, however this time under the 3rd rectangular shape. Duplicate it 2 more times so the 4th and Fifth rectangle has one too. The last blue line has to be a little much shorter. Select it and press CTRL+T (change) and reduce it. Replicate all the blue layers by selecting them and move them to the upper rounded rectangular shapes. Use the image listed below as a reference.

Step 12
Next we going to make barcodes and this is extremely time consuming, so bear with me. Initially we need 2 more standards, this time on 4.03 cm and 4.14 cm Horizontal.
Use the Line Device (gold color #E 9AB17) and draw a 2px line from all-time low of the filmstrip layer to the standard we made on 4.03 cm. Duplicate this line and move it 3px to the right, duplicate that layer and move it 3px to the right. Repeat this so you have 21 lines alongside each other. Look carefully, you’ll see I often moved the lines just 2px to the right. After that, reduce the lines to the guideline in the middle of the lines (that’s 50 %). Develop this barcode or create your own. I likewise needed a small rectangle to combine some lines. After that duplicate this barcode and move it to the right so you have one bigger barcode.
Step 13
This obviously all in a group so that you can duplicate the group to create more barcodes on the bottom of the filmstrip. I used a total amount of 10 barcodes!
Step 14
The next thing to do is make the background layer undetectable by clicking the eye next to the layer. Select the leading most layer and press CTRL+ALT+SHIFT+E to merge all the layers into one single layer on top of the other layers. Hide all other layers too and make certain the merged layer is chosen. CTRL+click the Forming 2 layer. This produces the “marching ants” around the rounded rectangles and press erase to remove the white rounded rectangular shapes. Press CTRL+D to deselect. Do the same with the Shape 2 copy layer. If you want a shadow behind the filmstrip then go to the Layer Styles and create one with Drop Shadow.
Step 15
The last thing we have to do is to add some pictures.
Open a photo you such as and push CTRL+A (this will choose to whole photo) then press CTRL+C (to make a Copy). Return to the filmstrip, utilize the Magic Wand Device and click as soon as in the very first white area where you desire the image to be (this will certainly choose that location). Go to EDIT => PASTE INTO and the picture is there. Resize it so it fits the area. Do this 4 more times and the filmstrip is done!