Learn Making Showpiece by Adobe Photoshop Tutorials
This Adobe Photoshop Tutorial has actually happened due to a couple of demands. This begins with a fairly simple object, and lastly ends up with the orbit showpiece Design. Take it step by step, and you will not only comprehend ways to develop this things, but understand that a little bit of thinking and understanding of light results goes a long method into producing great deals of things.
We will certainly start by making an easy glass ball and after that produce the last item.
ESSENTIAL *** all these calibrations depend on your eyes a lot, both the above steps as well as those to follow. Adjust to make the appearance just right.
Stage 1: Start making Orbit Showpiece
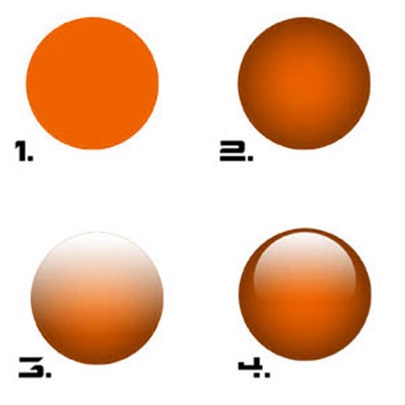
Step 1. make a basic circle with your elliptical marquee tool. Red produces a good colour, but you can choose anything you like.
Step 2. Give the circle a inner-glow layer style, simply change the glow colour to black and the blend mode to ADD. Why am I utilizing the Inner glow instead of the inner shadow? Due to the fact that inner glow doesn’t have an angular deflection, and thus is easily consistent.
Step 3. Load the option from the round location and on a new layer drag the linear slope (white to transparent) downwards from top (close to the bottom however not entirely bottom).
Step 4. Now press Ctrl/Cmd+T to transform the white slope. Drag the deals with to bring it upwards halfway through, and drag it in a bit in from the top and sides.
Produce a merged composite layer: Conceal the background— Create a brand-new blank layer on top and after that Press Alt+Ctrl+Shift+E (Alternative+Cmd+Shift+E on Mac) to create a merged layer on top.
Stage 2: Cutting the orbs

Step 5. take the merged layer and create a circular option above. the circle should be much larger than the initial circle. Again use your eyes to tell you what seems right, then copy the section and paste it in to a new layer. This creates the leading part of the orb. Place it once more in the appropriate exact position. (Cmd/Ctrl+J will copy the option to a new layer).
Step 6. Now to go onto the base of the orb. In a brand-new layer produce an eliptical shape that suits the lower half of the circle. Replicate this layer and minimize the size a little, as shown in fig. 6.
Step 7. Select the larger elipse layer and load its option by pressing Ctrl/Cmd and clicking the layer thumbnail. Now pick the cylindrical gradient device and choosing the grey-white-grey-white-grey colour combination, drag across.
Step 8. Duplicate this layer too and bring the replicate upwards, as shown. Now put the white small portion up above the actual gradiated layer. Position it as shown in fig. 8. Connect both layers and reduce their size by a bit, so that the external gradiated elipse is just a bit within the red circle.
Stage 3: Create the interior
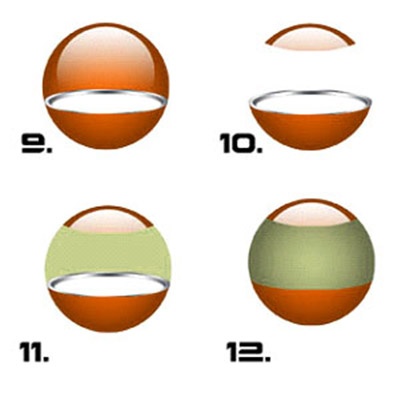
Step 9. Take the duplicated gradient layer and again choose it, now offering it a somewhat different slope of greys and whites. Now bring the duplicated gradient layer down. arrange it beneath both the other layers, and position as revealed in fig. 9. It needs to be a noticeable from both sides as it is the rim of the orb.
Step 10. Now to eliminate the parts of the orb that aren’t required. As previously by keeping Ctrl/Cmd pushed and clicking on the layer thumbnails; initially choose the big external rim elipse (with the gray slope) and then Shift+Ctrl/Cmd+Click on the thumbnail of the the upper leading portion layer (created in step 5).
You will now have the 2 elipses selected. We want to likewise pick the bottom portion of the orb. Select the Rectangle-shaped marquee tool hold down shift and drag over the bottom section. Inverse the selection (Ctrl/Cmd+Shift+I) and delete the middle part of the orb. The figure needs to look as it is in Fig. 10.
Step 11. Now to create the glass portion. Produce a circle of the exact same size of the orb, any colour you want. Put it behind the other layers.
Step 12. Just like the initial outer orb, offer it the very same sort of inner-glow impact, and now bring it forward so regarding cover all however the red outer parts of the orb.
Stage 4:
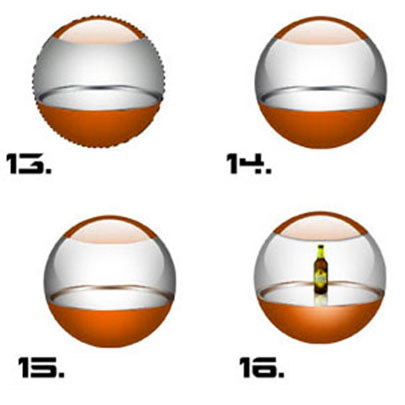
Step 13. Go to the layer scheme and make the fill amount =0. This makes the layer unnoticeable, however keeps the layer effects noticeable, as shown in Fig. 13.
Step 14. As you had finished with the red circle, ie, developing a white gradient reflection, create the exact same in a new layer above the glass layer, so as to produce a more sensible lighting result. Change the settings as required to make it as realistic looking as possible.
Step 15. Now pick the base layers, ie the grey metal gradient layers and the white elipse, and combine them together. After this press Cntrl+U to change the hue of the layer. Given that it’s grey, click on colorize, and adapt to a redish colour in keeping with the colour of the orb itself.
Step 16. Finally provide a really slight drop shadow to the upper portion of the red orb, just to achieve more realistic look. Secondly the lower part appears off. SO create a brand-new layer above the red lower orb section. Then choose the radial slope device, and pick the white to transparent choice. Now drag from somewhere above the red to a bit in. Remove parts that aren’t included within the red section. Inspect Fig. 16. to see the result.
Stage 5:
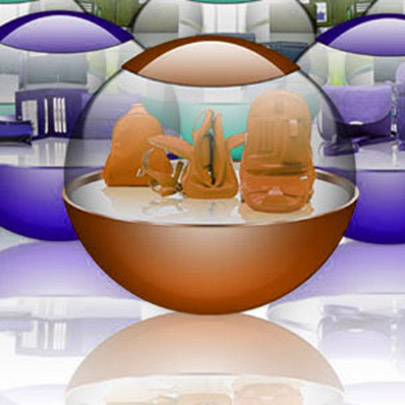
You showpiece is ready by this Adobe Photoshop Tutorial. You can display any products therein now, just make sure any Products kept in have a great reflection added on. This will give the base a shiny appearance.
Stage 6:
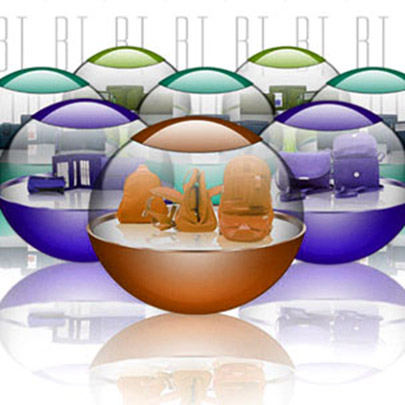
Shown right here are my futuristic orb booths, and the final variation .
