Corel Painter Tips for Working on Photos Painterly
In Corel Painter, if you count on the clone tools way too much, your paintings will not look extremely … painterly. Right here’s a checklist of tips to help you leave the image behind, to make sure that the end result is genuinely a paint.
1. Simplify.
Don’t copy everything in the picture. Among the tell-tale signs of an image is all the information: every hair on someone’s head, every petal in an arrangement. Look for larger shapes and colors. Squinting your eyes can assist with this.
2. Use a limited palette.
Making use of just a few shades and also mixing them together is a time-honored illustrator’s technique. This assists develop photographic harmony, as well as eliminates that every-color-in-the-rainbow appearance of an image. Even if you repaint really meticulously and genuinely, transforming the colors to those of your limited palette will make it look a lot more like a work of art, and also less like a photo. There are 2 tools in Painter that could assist you produce your combination.
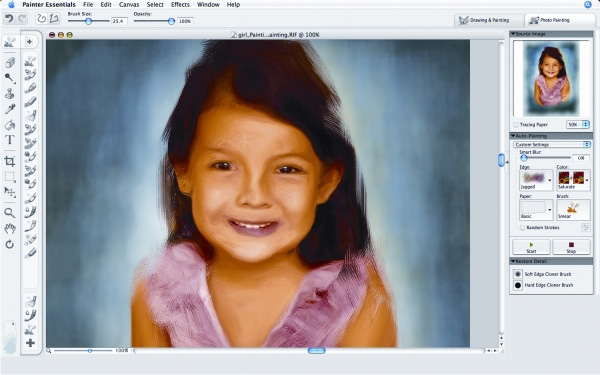
First is the Color Establish palette. Once you’ve duplicated your image, turn off the Duplicate Color switch (the “stamp” alongside the shade wheel). Produce a vacant color collection (Window > Shade Palettes > Show Color Collections, and also click the triangle in the palette’s top appropriate corner, pick “New Empty Color Set”, or click the unusual symbol in the lower left– see screenshot). Use the eyedropper to pick the loads or so essential colors, adding them to the combination individually (make use of the symbol at the combination’s bottom). Now paint over your duplicated picture, but paint making use of just those colors, or combinations of those colors. Utilize the mixing combination for this, if you such as.
The 2nd tool for producing a limited palette is located under Effects > Esoterica > Custom Shingles. From the drop-down, select Square, then make use of a Range of 40 or higher. The greater the range, the less the ceramic tiles. With this method, you could create (as well as save off under a name like “Photo-basic colors.psd) and after that, create a shade established from it. (Instead of “New Empty Color Establish,” pick “Create Color Establish from Image.”) I believe it’s useful just to see a greatly streamlined variation of a photo prior to starting painting. It assists you see the color scheme, and also just what the crucial colors are.
3. Get rid of black shadow as well as white highlights.
Pictures, specifically pictures, have the tendency to have a short vibrant variety, like a photocopier. Introduce a complete variety of values from black to white. Use the Degrees modification tool in Photoshop or the Results > Match tool in Painter to discover all the shades hidden in those black darkness. Look what does it cost? Detail I located in this kid’s suit.
4. Usage filters to transform the color scheme.
Before you begin painting, experiment with various filters to transform the mood and also lighting. The filters as well as results you make use of will differ depending on the needs of your specific photo. Remember that several filters created for Photoshop will additionally work in Painter. You will have to copy the filter files to your Painter directory initially. An additional method is to use the image in addition to itself, and also use the Gel composite method for the leading layer. To do this, go Select > All, and after that Modify > Copy, and also ultimately Edit > Paste in Place. (This is just how you duplicate a layer in Painter.) Change the new layer’s composite method to Gel, which gives the image richer color. In my instance, the original photo was pale and also lacking “oomph.” I created the Gel layer duplicate as described, and afterwards added a Layer Mask (even more concerning them here). I paintinged with black on the layer mask to expose her eyes as well as component of her temple. As you can see, I’m currently starting to going away from the original picture, producing a new state of mind.
5. Make use of a large brush.
If you’re fretting the little information, a large brush will help you simplify. Essentially, the regulation is: choose the brush size that seems right, and afterwards bump it up by 10 or more. In the beginning of a paint, this actually aids to maintain you focused on the huge picture. If you clone using a huge brush, you’ll combine tiny information into bigger forms, which is just what you want. Remember, you could constantly pull detail back in later from your original.
6. Changing the background.
Replace it with a new history from an additional photo. Or, as I’ve done below, make use of a dark slope with some texture used, for an official, “Old Master” style. We’re getting into the world of compositing here, combining images right into a brand-new photo. But even some straightforward changing could make a large distinction.
7. Go back.
When you work typically at an easel, it’s very easy to go back occasionally as you function. This is an excellent practice, to ensure that you do not forget the full picture. In the digital world, you can rise and also bow out the display. It’s a smart idea to do that simply for your eyes’ benefit! Yet you can likewise make use of the zoom function in Painter to see the painting at a tiny size. Click the “looking glass” zoom tool, and you’ll see some new options appear up top: Actual Pixels, Zoom to Fit, and also Facility Image. (Bonus tip: you could add each of these to a custom-made palette, if you select. You can include commands in addition to brushes to custom schemes. My favorites are Conserve as well as Reverse.) To minimize the dimension, hold the Option/Alt key while clicking on the image with the zoom tool. Or utilize the zoom scale in the bottom left corner. Or … Generally, deal with the picture zoomed bent on 100% or less when you’re beginning. Raise the zoom when paint thoroughly later on.
8. The eyes have it.
In a portrait, the eyes must be the initial point the customer sees, followed by the remainder of the face, complied with by the figure. Lead the eye by using the greatest contrast and also the majority of detail in the eyes. The further away from the face, the much less detail must show. In the following example, notice as well how the brightest shades are in the face, attracting you in. I’ve utilized skintone colors not in the initial picture. This additionally helps it look less like an image. For appointed pictures such as this, you need to remain real to the sitter’s similarity, naturally. This is probably the best difficulty: aiming to create a painterly look while still continuing to be reasonable.
9. Start with Quick Clone.
In Painter, begin with a Quick Duplicate, as well as block in the significant shapes quickly with a huge brush. Right here I have actually filled up the Canvas with a tan shade, then begun the cloning on a layer above that. If you prefer to begin with a Clone, initial apply a texture (such as canvas) to the clone, to make sure that you can see where you have actually paintinged as well as where you haven’t. If there’s still canvas appearance proving, you haven’t touched that part yet.
10. Begin with a sketch.
This is the best way to end up with a paint, merely due to the fact that no cloning is included at all. You could pick colors from your source photo, but the illustration is all you, functioning without a net. In Painter, open the photo you wish to painting. Add a blank layer over it, as well as fill it with either white or a color of your picking. You could apply a drawing paper surface area if you like. Next, decline the layer’s opacity so you can see the photo underneath. Choose a pencil (I make use of a 2B with a tool opacity) as well as begin mapping away. (If your preparing skills depend on the job– and mine typically aren’t– sketch without tracing. Just open up an empty record next to the picture paper, as well as begin attracting.) When the illustration is done, you’ll intend to duplicate it. Then, add a blank layer above the illustration layer, and also begin paint. You can see several of the steps in this process below. I need to admit, when I began the painting (bottom left), I did use rough cloning. Old habits die hard.
