This tutorial came out of a request from the online forum. I was asked if I might make a reasonable rope. 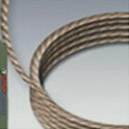
Practical rope in Photoshop Photoshop Tutorial
Step 1
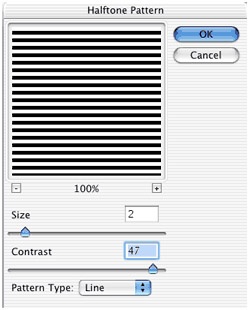 Practical rope in Photoshop Tutorial: Develop a new document. The size right here is truly vital due to the fact that it will certainly identify the angle of the coil. In this example I made use of 600×600. Look at the 2 examples at the end of the tutorial, the variation was added on 800×600, notification that the angle is a little wider and less round. Personally I think I choose the 800×600, however explore different sizes and see how you like the results. Produce a new layer and pick filter > sketch > halftone pattern. Size =2 (use higher for a higher res image). Press the contrast very high.
Step 2.
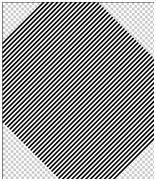 Now turn the pattern by pushing cmd/ctrl+T for free change and then pulling one of the corners around. (You may enlarge the pattern to fill more of the page if you want.).
Step 3.
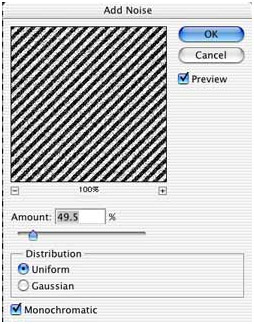 To give a more worn away appearance include some sound: filter > sound > include sound.
Step 4.
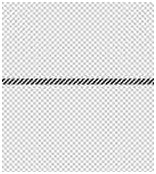
![]() Make a selection with the rectangular marquee tool. This will certainly be a hair of rope.
Make a selection with the rectangular marquee tool. This will certainly be a hair of rope.
Step 5.
 Press Cmd/ctrl+J to copy the choice to a new layer. Hide the layer beneath by clicking on the eye icon. Position the rope near the center of the page.
Step 6.
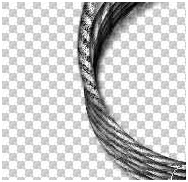
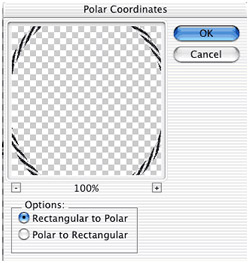 Lets make it coil … filter > misshape > polar collaborates and pick rectangular to polar.
Step 7.
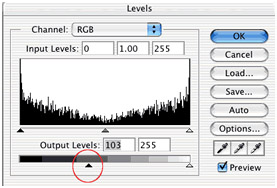 Te contrast in between the black and white is too strong, lets tone it down a bit by selecting the levels manage. Cmd/ctrl+L. Move the bottom slider (shown) to the right to tone down the shadows.
Step 8.
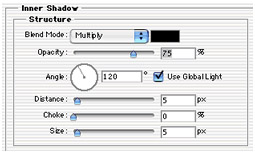
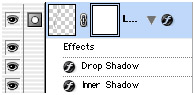
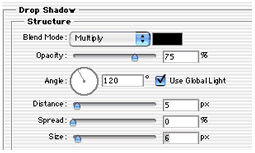 Lets include some depth. Press the little “f” in the layers palette to open the layer designs. Pick inner shadow. Make use of the setting right here. Also include a drop shadow as shown.
Step 9.
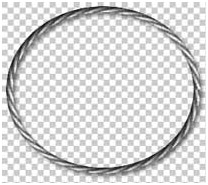
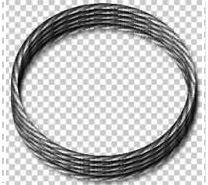 Press ok and you will certainly see a reasonable loop of rope. Duplicate the layer 4 or 5 times and stack them as revealed, we now have the coil.
Step 10.
![]() Now for completion of the rope:. Show the pattern layer once again and select and copy it to a new layer much like we did previously. (cmd/ctrl+J).
Now for completion of the rope:. Show the pattern layer once again and select and copy it to a new layer much like we did previously. (cmd/ctrl+J).
Step 11.
![]() Turn the rope 90 deg.
Turn the rope 90 deg.
Step 12.

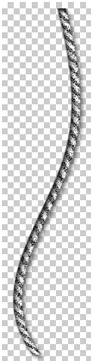 To make it “wiggle” filter > misshape > shear. Click to add points and drag as shown. Press ok.
Step 13.
Let’s mix it in. Add a layer mask by clicking the brand-new layer mask icon in the layers palette.
Step 14.
 Select a large soft black brush and paint the very end of the rope and notice it will certainly fade smoothly into the coil.
Step 15.
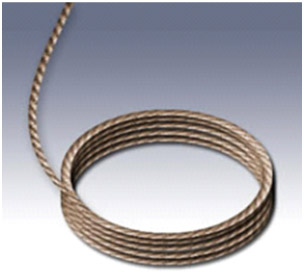
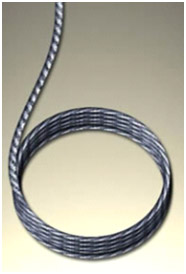 To the left is our last rope with a little hue/saturation contributed to provide it a hint of color. Right here is a variation with a larger canvas width and a various hue/saturation value applied. I also nudged a few the “coils” so they were not so best. This leads to a more natural finish. So there you have it “yehaw” round ’em up cowboy! Have a good time with the rope and see you at the café.
